About the story, techniques, and inspiration behind the lens of creating the image, including valuable photography tips. In this article, I share information about where I shot the ‘sunrise above the clouds’ image, how I shot it, and in what lighting conditions. Apart from that, I will share what camera equipment I used, and how I edited the photo.
Every photo tells a story and behind every story, there’s a storyteller.
I like to share background information on how I captured a moment and what inspired me to create an image including the technical details, like camera settings. Photography is not only about techniques but also about the person behind the lens. Therefore, I will occasionally share the story behind the lens of several of my images.
Location of the photo
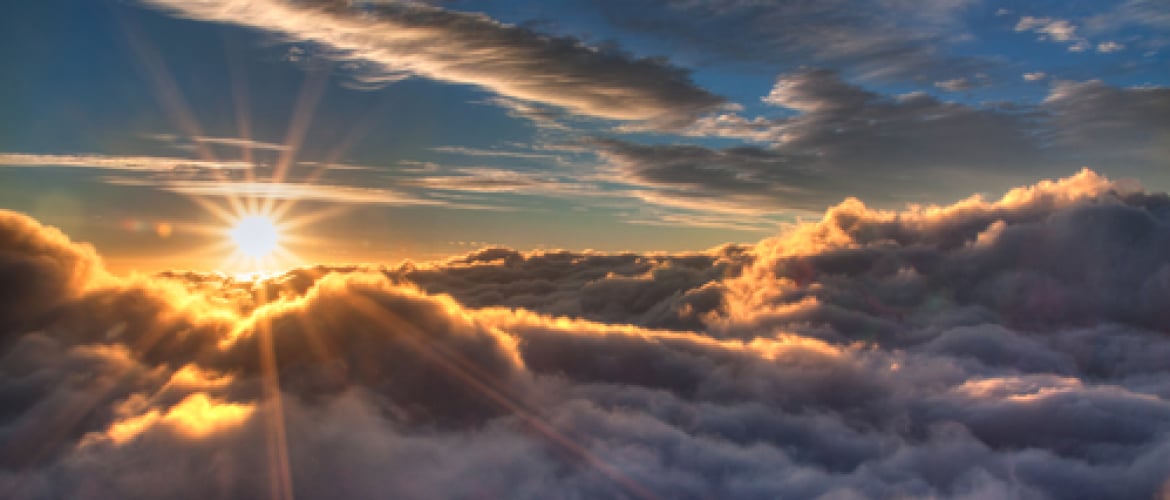
This photo was taken from the Witches viewpoint in the Drakensberg Mountains (South Africa) at a height of 3000m above sea level.

Behind the Lens: Image settings and camera equipment
This sunrise above the clouds was shot on a Canon EOS 50D with a Sigma 18-200mm lens on a tripod using a cable release. Image settings: ISO 200 with an aperture of f/22 and three different exposure times.
Time and date of shooting the image: sunrise above the clouds
The image was shot back in May 2012, when I just started learning photography. I remember waking up at 4 am to get ready for a hike to Sentinal Peak. We wanted to start hiking early – in the very dark – to reach Witches viewpoint before sunrise.
The walk up to the viewpoint was heavy for me; I was out of breath. Probably because my body had to adjust to the altitude. I needed more short breaks but luckily we arrived at the viewpoint in time, just before a perfect sunrise in one of the most beautiful UNESCO World Heritage Sites in South Africa. The view was magnificent! To my excitement, a very thick mist inversion was present. The sunrise looked very promising and turned into one of my favorite images from the 4-day trip to Drakensberg Mountains.
The lighting of the ‘sunrise above the clouds’ image
My aim was to do a sunrise shoot at Witches viewpoint, not knowing how the weather and light conditions would be since they can change rapidly at that altitude. The present mist and clouds added drama to the image. I loved how the clouds lit up by the warm glow of the rising sun and how I was able to capture the sun with multiple sunbeams.
How I edited the sunrise photo
RAW files captured by our cameras need some level of processing to bring them to life, to do justice to the scene we photographed. In this case, I used 3 bracketed RAW images (-2, 0, +2) to get this final blended and edited image because one RAW image didn’t contain enough information that could be retrieved from the scene. There were both very bright highlights (sun) and very deep shadows (in the clouds). By bracketing the photographs the camera detects either of the detail in the dark areas or more of the detail in the bright areas. I combined all three bracketed images to create one HDR image that is a reasonable representation of the scene as I witnessed with my human eye.
Behind the Lens of what inspired me to take this photo
I love witnessing sunrises and sunsets and I love chasing them. I don’t exactly know why, but I always get excited when the sky turns in pretty colors, and guess what, it’s totally free to watch nature’s most beautiful phenomenon every single day!
Before we left to hike to the top I knew it would be an activity which isn’t always pleasurable whilst you’re doing it, but grant you a reward of total exhilaration and a massive sense of achievement once you’ve completed it. And it was exactly like that! The hiking part wasn’t very easy for me, but watching the sunrise across the vast African horizon was truly special. The present mist and clouds were an additional gift to add more drama to the image. I wanted to capture nature’s colorful play of the sun slowly rising above the clouds and that is what I did. I’m still very happy with the result and it was definitely worth the hike!
Story, techniques, and photography tips from behind the lens
The Drakensberg is one of South Africa’s most beautiful landscape features and possesses some great trekking routes. Because the Drakensberg is mountainous (with an average height of 3000m above sea level) it experiences extreme weather throughout the year.
From a photographic point of view, extreme weather also means you shoot some interesting images. If you want to do a sunrise or sunset shoot it is recommended to do some research (time of sunrise, the location, departure time) to avoid disappointments. Be prepared to witness different colors and changing weather conditions (clouds, rain, mist, snow) if you want to photograph the sunrise above the clouds.
Patience is Key
Once you are on your spot you have to be patient and wait for the right moment; especially in a place like this. But above all ‘patience’ is the keyword and remember your tripod is your best friend!
How to capture the sun with multiple sunbeams?
If you want to capture the sun with various sunbeams you have to use a small aperture – the higher the number, the more beams. That is why I chose to use an aperture number of 22 (f/22).
What to pack for a hiking trip in Drakensberg Mountains?
Pack a zoom lens, for example, a 70-200 2.8mm lens, and a wide-angle lens, for example, a 16-35mm 2.8 lens. A wide-angle lens is great for landscape photography. Don’t forget to take your tripod.
Behind the lens of creating the ‘sunrise above the clouds’ image
Did you enjoy the story behind the lens of the ‘sunrise above the clouds’ image? Maybe you’re also interested in Behind the lens of creating the ‘This is Africa’ image. If this blog inspired you to travel to Africa, check out my Ultimate Africa Travel Guide.
In case this travel photography blog was helpful for you, you would make me very happy by sharing this article on your social media channels, like Facebook, Twitter, or Pinterest.

